Sunday, November 24, 2013

Butternut Squash Dessert Pudding! GF, V, SCD, BED, Paleo!


Hey Happy Tummies!

Four more sleeps until Thanksgiving!!! Wooo!

I am so excited. I've been dreaming up the Vegan/Paleo/SCD dishes I'll be making.

For the first time ever, I think it's going to be a completely gluten free thanksgiving, as the majority of my family that will be there are GF! So there will be lots to share:)

Alsooo, it's my niece's first Thanksgiving!! Lots to be thankful for:)

So today, I'm sharing a recipe that I literally cannot live without. I eat this probably 3 times a week and I'm not even joking. It is THAT good!

I've shared this recipe a long time ago, but the photo was...well...less than beautiful. Sooo, I've updated the pic and decided to share it because it would be a PERFECT side dish for thanksgiving!

What is it?


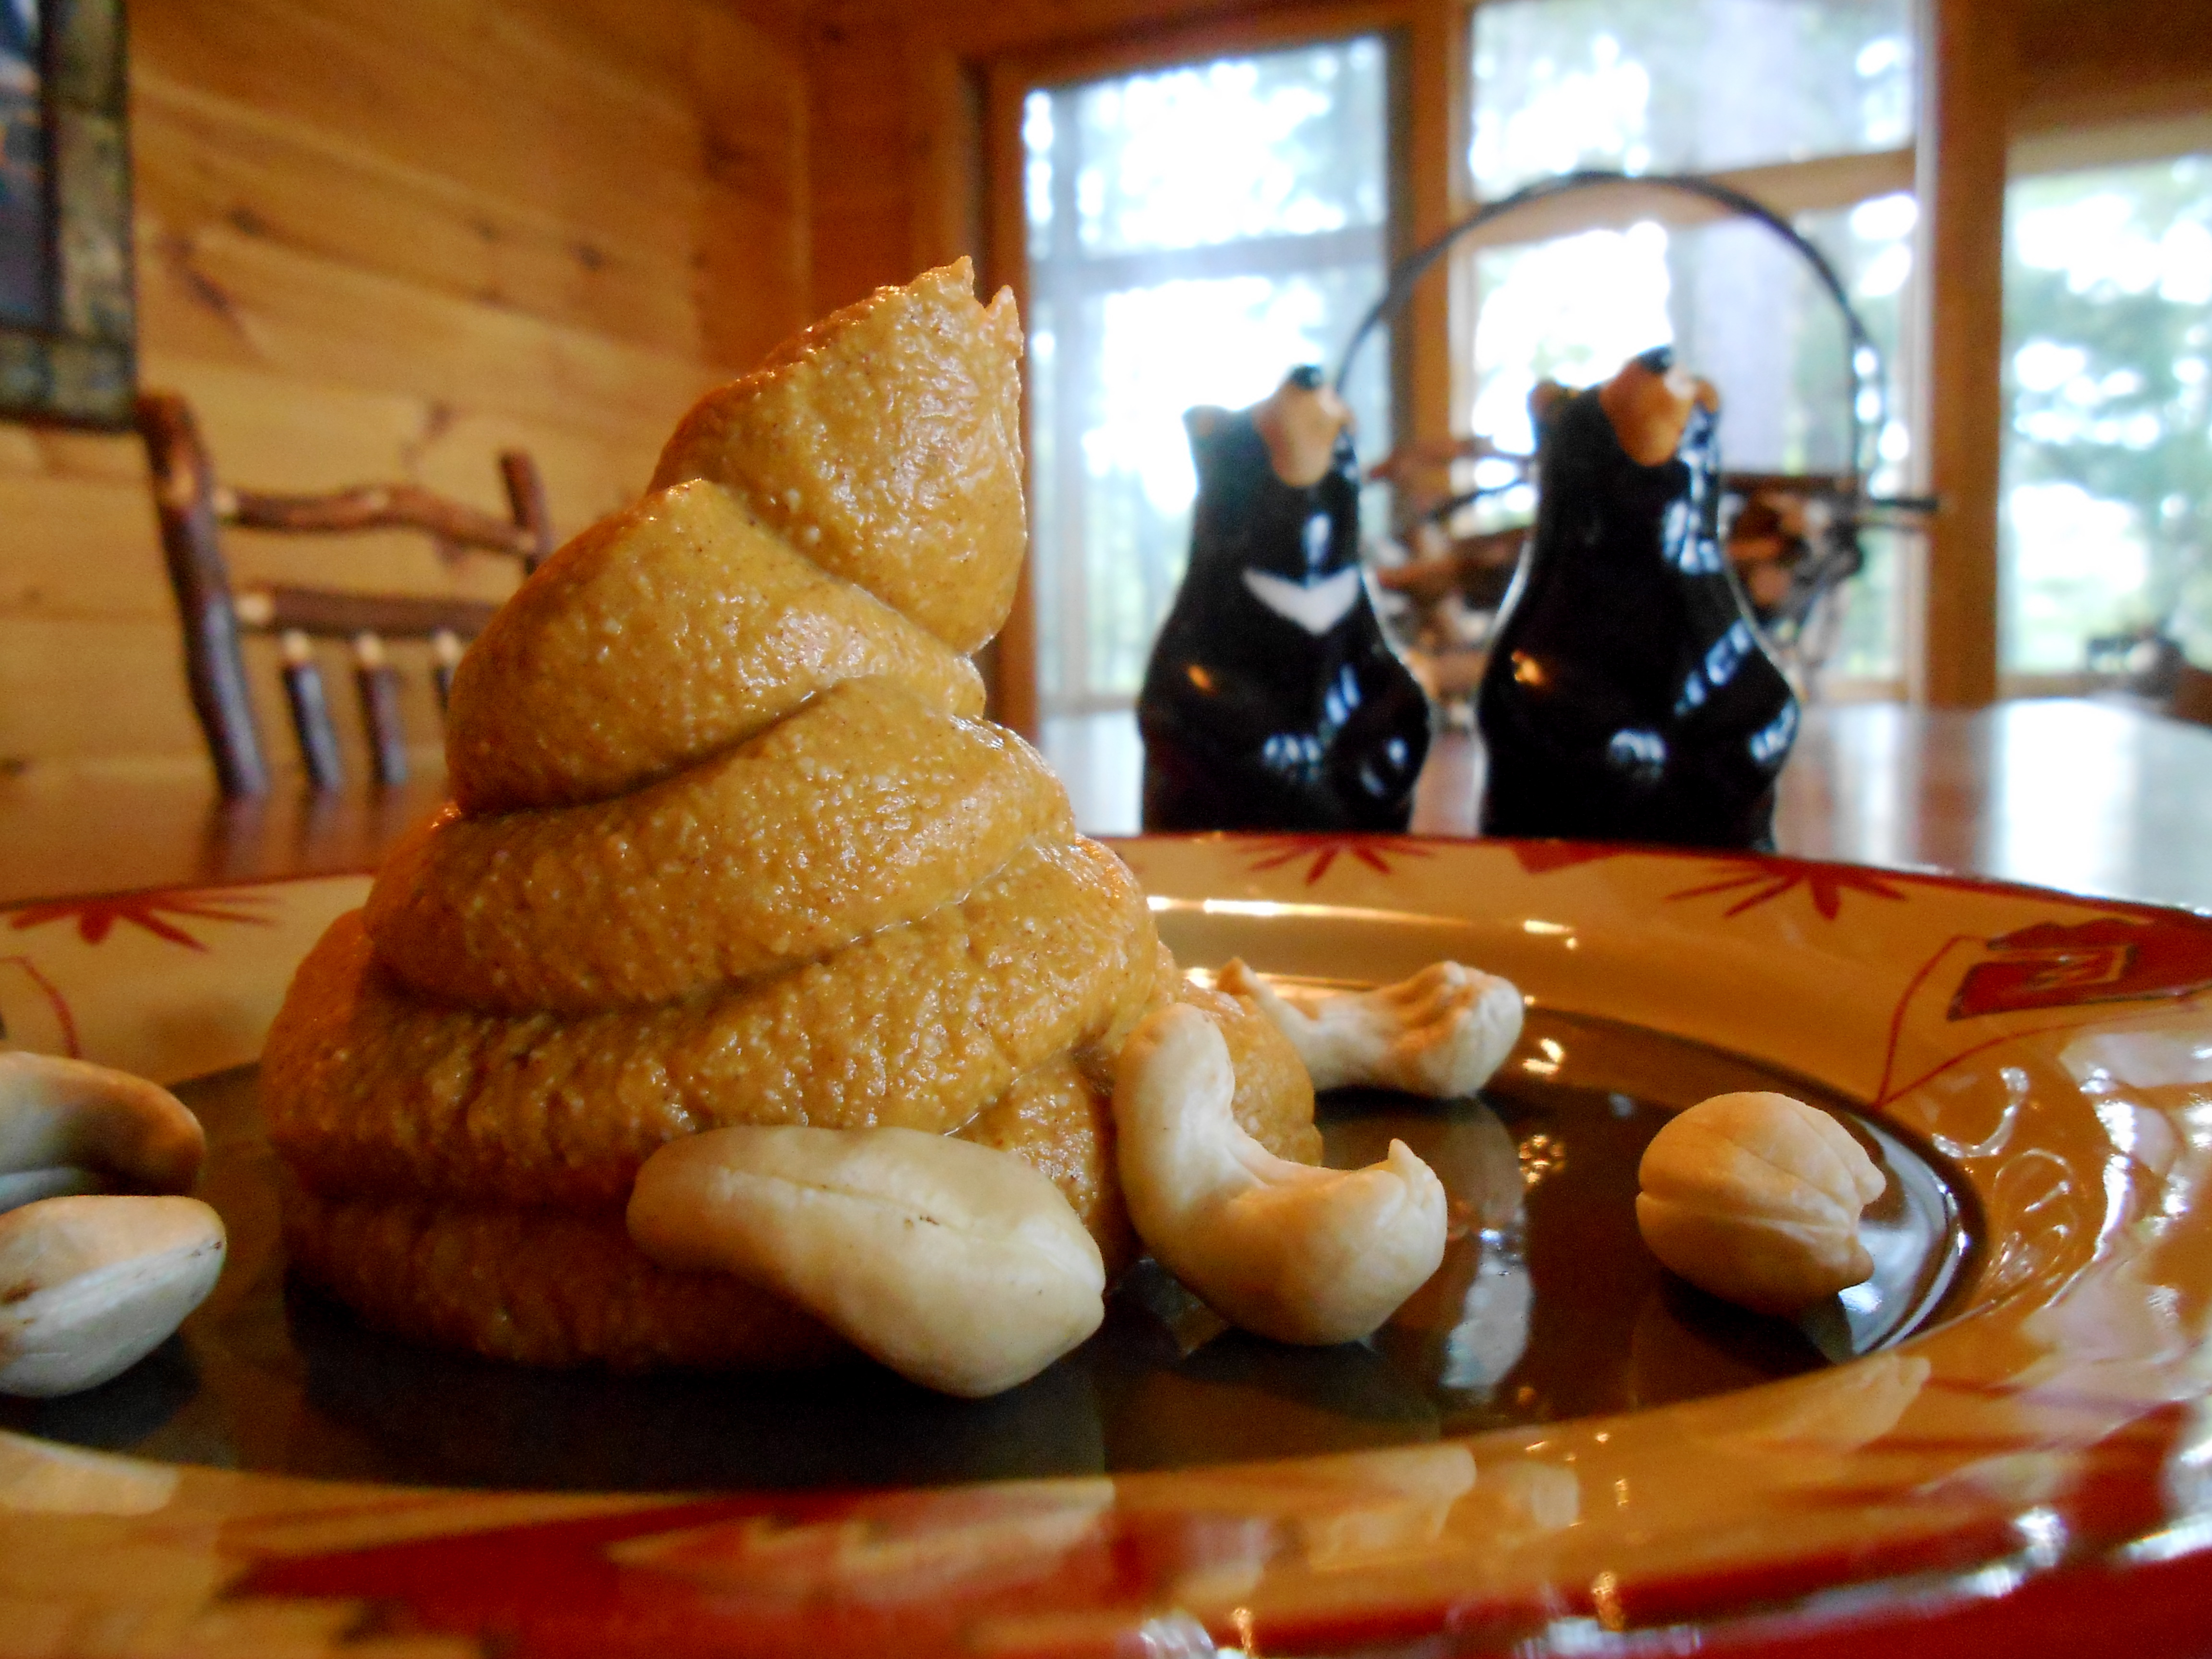
BUTTERNUT SQUASH PUDDING!

Gluten free, vegan, SCD, BED, Paleo and 100% delicious.

I like to put it in the freezer for an hour before I eat it and it is literally like ice cream. My mouth is watering just thinking about it.

This recipe has actually been a life saver for me. Lots of people ask me, after learning about my diet, "how do you stay sane? How do you do it?!" Well friends, this pudding is the answer. Being on the SCD, it's true: you can get into the mindset of feeling deprived if you dwell on all the things you CANNOT eat. But, I've found if you can find even just one thing that you REALLY enjoy, and can look forward to, you're fine. So maybe I look forward to butternut squash instead of chocolate or Reeces peanut butter cups...big whoop. It's my favorite food and helps me remain faithful to the SCD. :)

The way this recipe came to be is actually a funny story. So if you've been following my blog, you may know that I used to LOVE a recipe that was very similar to this, but made with carrots. (see below)

It was my saving grace during the Body Ecology Diet. And I pretty much ate it every other day-I'm telling you, it was that good. Well friends, I literally turned orange from eating so many carrots! It's not an urban legend, you really do turn orange!! Look how orange I was at Christmas last year!!

So my brother, being a doctor, was like, Care, you're getting a toxic dose of Vitamin A and it could be doing damage to your eyes.

Sooo, I did some research, and found that butternut squash has a lot less beta carotene (what turns into Vit A) than carrots. So, the substitution was officially made. And to be honest, I don't eat carrots anymore. Because even if I have a few baby carrots, that orange color comes back to my hands and face. The human body is crazy, huh?

So without further ado, here's my favorite food!
Here’s what you need:
1 small butternut squash: halved and roasted (or diced and steamed)
1/4 cup raw cashews
2 dropper-fulls of alcohol free, pure liquid stevia (SCD use 2 tsp honey, or more to taste)
2 tsp cinnamon
pinch of nutmeg
pinch of ground cloves
tiny pinch of sea salt
You have 2 options to prepare your squash.
Either A) Peel your squash and dice it into small cubes. In a steamer basket, steam for about 20 minutes until tender. Then, let it cool, and wring out all the excess liquid with a clean kitchen towel or paper towels. This is how I make it.
OR B) Preheat oven to 400 degrees. Carefully cut your butternut squash in half lengthwise and scoop out the seeds. Line a baking sheet with tin-foil and spray with olive oil. Spray or rub the cut-side of the halves with olive oil, and roast cut-side-down for 40 minutes.Let them cool for several minutes, and then scoop out the flesh.
Combine the flesh in the food processor with the rest of the ingredients. Process for 2 minutes, until creamy and smooth, scraping the sides twice. Enjoy warm, or chilled in the freezer for an hour.
Oh. My. Gosh. This is sheer decadence. It is buttery smooth and down-right amazing! It seriously tastes like pumpkin pie! My parents tasted it and couldn’t believe that there wasn’t cream or butter in it!


The flavor is straight out of a Thanksgiving Yankee Candle – ok, that maybe doesn’t sound too appetizing, but the flavor brought me back to the Thanksgiving table, eating pumpkin pie with my family. The cinnamon, nutmeg and clove give it such a warm spiciness, that just travels through your senses and warms your soul. Ok, maybe a little dramatic, but it is just SO remarkable.


Finally, the texture is just rich and luxuriously creamy. I particularly enjoy it semi-frozen. It's seriously like ice cream:)
And to make it extra special for Thanksgiving, I'm going to toast a few pecans with cinnamon and honey, and sprinkle those on top:)
How's your Thanksgiving prep going?

Thursday, November 21, 2013

Twas the Week Before Thanksgiving...


Twas the week before Thanksgiving and all ‘round the blogs,
The masses were hunting for pie and eggnog
The posts were all hung on the pages with care
In hopes that their readers would enjoy them with flair!
The foodies were ready with pencils and pad
To jot down some recipes they were craving “real bad”
When what to their wondering eyes did they find?
But a green bean casserole, of the Gluten Free kind!
With an ingredient list so wholesome and free,
They knew in a moment, “this dish is for me!”


Yep, I Veganized and SCD-ified the classic standby – Green Bean Casserole!  -- Canned green beans with cream of mushroom soup and french fried onions. Sounds like a dish out of the fifties doesn’t it?! Not my version, friends. I used fresh, organic green beans, a homemade mushroom soup, and homemade baked onion rings! It was remarkable. 


And, it’s Gluten Free, Vegan, Body Ecology Diet friendly and Specific Carb Diet friendly!
Here’s what you need:
3 cups of fresh green beans, blanched
Soup:
5 1/2 cups of sliced mushrooms – I used 1 carton of shiitake and 1 carton of button (BED use shiitake only)
1/2 onion, diced
3 garlic cloves, minced
1/4 tsp minced fresh rosemary
2/3 cup coconut milk
1/2 tsp salt
pepper
Onion Rings:
1/2 onion, sliced and separated into rings
1 cup almond flour
1/4 tsp salt
5 cracks of black pepper
1 egg white (Vegan option: almond milk)
Preheat oven to 375. Set up your “breading station.” You’ll need one bowl filled with your egg white (or almond milk). You’ll need another bowl filled with your almond flour, salt and pepper. Then, you’ll need a baking sheet that’s been covered with tin foil and  sprayed with olive oil.
Coat your onion rings with the egg, then with the almond flour, and then place on the baking sheet. Fair warning: this is a bit of a messy job. I find it’s helpful to have a “wet hand” and a “dry hand.” Once all your rings are coated and on your baking sheet, spritz them with olive oil, and sprinkle with salt and pepper. Bake for 20 minutes, until golden brown, flipping half way through. Cut into 1 inch pieces, and set aside.
Meanwhile, blanch your green beans by boiling them for 2 minutes, and then shocking them in a bowl of ice water.
Next, the soup: Saute your onion and garlic in 1-2 tsp of EVOO, salt and pepper for about 4 minutes. Once they’ve softened, add your mushrooms and let them cook down. Transfer the veggies into your food processor along with the rosemary, coconut milk, and salt. Blend until smooth. It will be thick.
Finally, spray a small casserole dish with olive oil. Toss your green beans with the soup, and put in the casserole dish. Bake at 350 for 25-30 minutes. After you take it out of the oven, sprinkle your onion rings over the top. Then, dig in!


This was fantastic!! The flavor was so incredibly savory and homey. The slight hint of rosemary really elevated the flavor and gave it a gourmet touch! The onion rings on top were crunchy and had a toasty, nutty flavor from the almond flour.


And the casserole was just delicious with the fresh green beans! It was creamy and velvety and just…decadent:)


It was the only dish on the Thanksgiving table that we polished off!! Everyone loved it…no matter what diet they followed!


So give this classic update a try! You won't be disappointed!

Stay tuned for more Thanksgiving recipes over the next few days!


Want more GFHT?  You can now get my e-cookbook, The Best of GlutenFreeHappyTummy for only $2.99 on Amazon!

Sunday, November 17, 2013

Balsamic Roasted Fennel and Beets w/ Blistered Green Beans! Gluten Free, Vegan, SCD & Paleo!

Hey Happy Tummies!

Well Sunday night, and another weekend has come and gone entirely too fast!

Did you do anything fun? I definitely did. Hit up the Meatpacking District...fun times! There's always a new adventure to be had in the Big Apple.

So I am SO excited to share this new and delicious recipe with you! It's super easy, yet a showstopper...so it's perfect for a Thanksgiving dish, or for an easy weeknight meal!


All the flavors of fall with a delicious sweet addition: FENNEL.


Now, if you've never had Fennel before, or if you've had it but think you don't like it...do yourself a favor and give it another shot. When it's oven roasted, it is absolutely AMAZING! It caramelizes and becomes beautifully sweet and licorice-y.


And with balsamic vinegar --- get outta town!

That's right, I made balsamic roasted fennel and beets with roasted butternut squash and blistered green beans.


Talk. about. incredible.

And it's Gluten/Grain Free, Vegan, Specific Carb Diet, and Paleo!


Here's what you need: (Serves 1)

1 large beet, sliced into 1/4 inch rounds
1 large bulb of fennel, sliced vertically in 4
12 green beans
1/4 cup cubed butternut squash
1 cup baby spinach

1 tsp herbs de provence
2 Tbsp good balsamic vinegar

Preheat oven to 400 degrees. To prepare your fennel bulb, cut off the big stalks that look like celery. :) Then, remove the outer "leaves." Keep the core, (the little "button" at the base) intact. When you slice it vertically into 4, 1/4-inch disks, make sure to keep a bit of the core in each disk to help it stay together.

Also, scrub and dry your beet. Slice it into 1/4 inch disks. Next, cube your butternut squash into 1/2 inch cubes.


Place your fennel and beet disks, and butternut squash on a tin-foil-lined, olive-oil-sprayed baking sheet in a single layer. Spritz with olive oil and sprinkle with herbs de Provence and a pinch of salt and pepper. Bake for 40 minutes, flipping once halfway through.

When you flip your beets, fennel and squash, add your green beans to the baking sheet. Drizzle your veggies with the balsamic vinegar. Return to the oven for the remaining 20 minutes.

When your veggies are finished in the oven, sprinkle with sea salt. Slice your beets into 1/4 inch matchsticks. Slice your green beans in half.


To assemble, place a bed of spinach on your plate. Place your fennel on the spinach. Then, put your beets, butternut squash, and green beans in a pile on top.

What a wonderful meal! Roasted veggies are one of my favorite foods! Something magical happens in the oven when you oven roast beets and butternut squash. Their natural sugars caramelize and it brings out the sweetness in the veggies.


And the balsamic vinegar reduces and becomes perfectly sweet! Paired with the roasted veggies and blistered beans, it is out of this world!

And the texture of the fennel is amazing. It is chewy and almost creamy! Mmmm!


Finally, it is a beautiful dish with the deep purple, vibrant orange, emerald green and golden fennel. It looks like autumn on a plate!


Have a great week!


Want more GFHT?  You can now get my e-cookbook, The Best of GlutenFreeHappyTummy for only $2.99 on Amazon!

Thursday, November 14, 2013

New HealthiNation Episode is Up!

Hey Happy Tummies!

We're officially TWO WEEKS out from Thanksgiving!!!!!!

Oh my gosh, CAN. YOU. BELIEVE. IT!?! 

Time is seriously flyyyyying by!

NYC is now officially officially in winter mode! I've been bundled up in my sleeping bag coat, scarf and hat.

Well I have 2 exciting announcements. 

First, my next Gluten Free Cooking Show webisode is up on HealthiNation!


Just click the link, and then click on the photo of the “Vegan Strawberry FroYo” to see it! 


Next, there's a delicious new treats spot coming to the Lower East Side! I walked past this exciting sign today:


And I MAY be able to enjoy this because they have coconut sugar-free varieties!! Oh. My. Gosh!!! :D

To continue with the "fro-yo" theme of this post, here's a pic of a treat I recently enjoyed at Hu Kitchen. It's from their "Mash Bar" -- think Vegan & Paleo Pinkberry. They have different bases, like chia pudding, taro root pudding, coconut cream and cashew cream, with all different organic toppings. Grain/Gluten free, dairy free, vegan, SCD friendly, Paleo and all organic! So So incredible!


This little number has a sweet cashew cream base with bananas, goji berries, strawberries, and grain free granola. Y.U.M. TO THE MAX.


All right! That's all for this evening! I made a fantastic new recipe tonight! I can't wait to share it with you soon!

xoxo

Sunday, November 3, 2013

Autumn's Acorn Array! Gluten Free, Vegan, SCD & Paleo!

Hey guys!


Well we officially survived Halloween!


How was everyone's spooky weekend? Mine was great. I went as a hipster:)


I'm quite preppy in real life, but secretly want to be a hipster. So I was kinda going as my alter ego. And It. Was. Awesome!


What did you dress up as?


I saw a lot of wonder women, supermen, breaking bad guys, and "jailers". Believe it or not, I did not see one Miley Cyrus. #notcomplaining ;)

So, since we're in November now, (crazy, right?) let the Thanksgiving prep begin!!


This meal. Oh boy. I made it last weekend and it was SO freaking delicious, I think I'm going to make it again for Thanksgiving!


It's Gluten and Grain Free, Vegan, SCD and Paleo!

What is it?

Pan Seared Brussels Sprouts, Roasted Eggplant and Beets over Mashed Acorn Squash.....or in a more fun way: Autumn's Acorn Array! 


Talk about comfort food!

Here's what you need: (serves 2)

1 acorn squash, steamed and mashed
12-14 Brussels Sprouts, halved
1 Japanese eggplant, sliced into 1/4 inch rounds
1 large beet (or small), sliced into 1/4 inch rounds
1 tsp Herbs de Provence

Preheat oven to 400 degrees. Prep your eggplant and beets. Place your eggplant and beet rounds in a single layer on a tin foil-lined, olive oil-sprayed baking sheet. Spritz with olive oil and bake for 35-40 minutes, flipping once, halfway through. 


Meanwhile, carefully prick your acorn squash ALL OVER with a fork or sharp knife (be careful!!). Place it on a paper towel in the microwave, and cook for 6 minutes. Flip with an oven mitt, and cook for 5 more minutes. (Be sure to prick it A LOT, or it will explode. I may or may not know from experience:) )

When the acorn squash is finished cooking, carefully remove it from the microwave with an oven mitt and let it cool until you can touch it. Then, carefully cut it in half. Scoop out the seeds and discard. Then, scoop out the flesh and place it in a medium-sized bowl. Mash with the back of a fork and a pinch of salt.

Finally, pan sear your Brussels sprouts by placing them in a single layer in a large skillet with 1-2 tsp EVOO. Sprinkle with Herbs de Provence and salt. Let them sit and caramelize for about 7 minutes over medium heat. Then flip, and let them cook for another 5 or 6 minutes. Remove from heat.

Lastly, dice your eggplant and beets into bite-sized pieces. Toss with the Brussels sprouts.


To assemble, place a mound of the mashed acorn squash on your plate. Top with your Brussels sprouts/eggplant/beet mixture. Top with a final dollop of acorn squash mash.


This was just spectacular. The acorn squash was so creamy and pleasantly sweet. That paired perfectly with the earthy sweet beets, and beautifully caramelized Brussels Sprouts. And the Herbs de Provence gave it this complex flavor that was herbal, floral, slightly sweet and earthy. If you've never had herbs de provence before, it's a really great spice! It's delicate and pairs well with things with subtle sweetness. It has lavender, oregano, fennel, basil, thyme and other delicious spices.


The textures were so on point. The acorn squash was luxuriously creamy where the Brussels sprouts were chewy and hearty. And then the beets were just chewy and sticky. Finally, the eggplant was almost creamy - just delicious!


And it was so beautiful too. I would be proud to serve this at Thanksgiving. Plus, it's got all the colors of fall! It would match the Thanksgiving Decorations! :D

Happy cooking!


Want more GFHT?  You can now get my e-cookbook, The Best of GlutenFreeHappyTummy for only $2.99 on Amazon!